
Companies and teams require a Business plan or higher. If your workspace is on a lower
plan, sign-ins won’t create any groups, so you won’t see the tabs described below until you
upgrade.
Companies, teams, or something else
“Company”, “team” and “workspace” aren’t fixed categories Sleekplan defines: they’re whatever your own system calls the accounts it sends over. If your product organizes customers into companies, you’ll see a “Companies” tab. If it’s teams within one company, you’ll see “Teams” instead, or both side by side if your integration sends more than one kind.Finding your groups
Open Customers and look at the tab bar at the top. Alongside Customers, you’ll see one tab per kind of group your workspace has received, each showing how many exist. Selecting a tab shows that group’s list instead of your individual customers.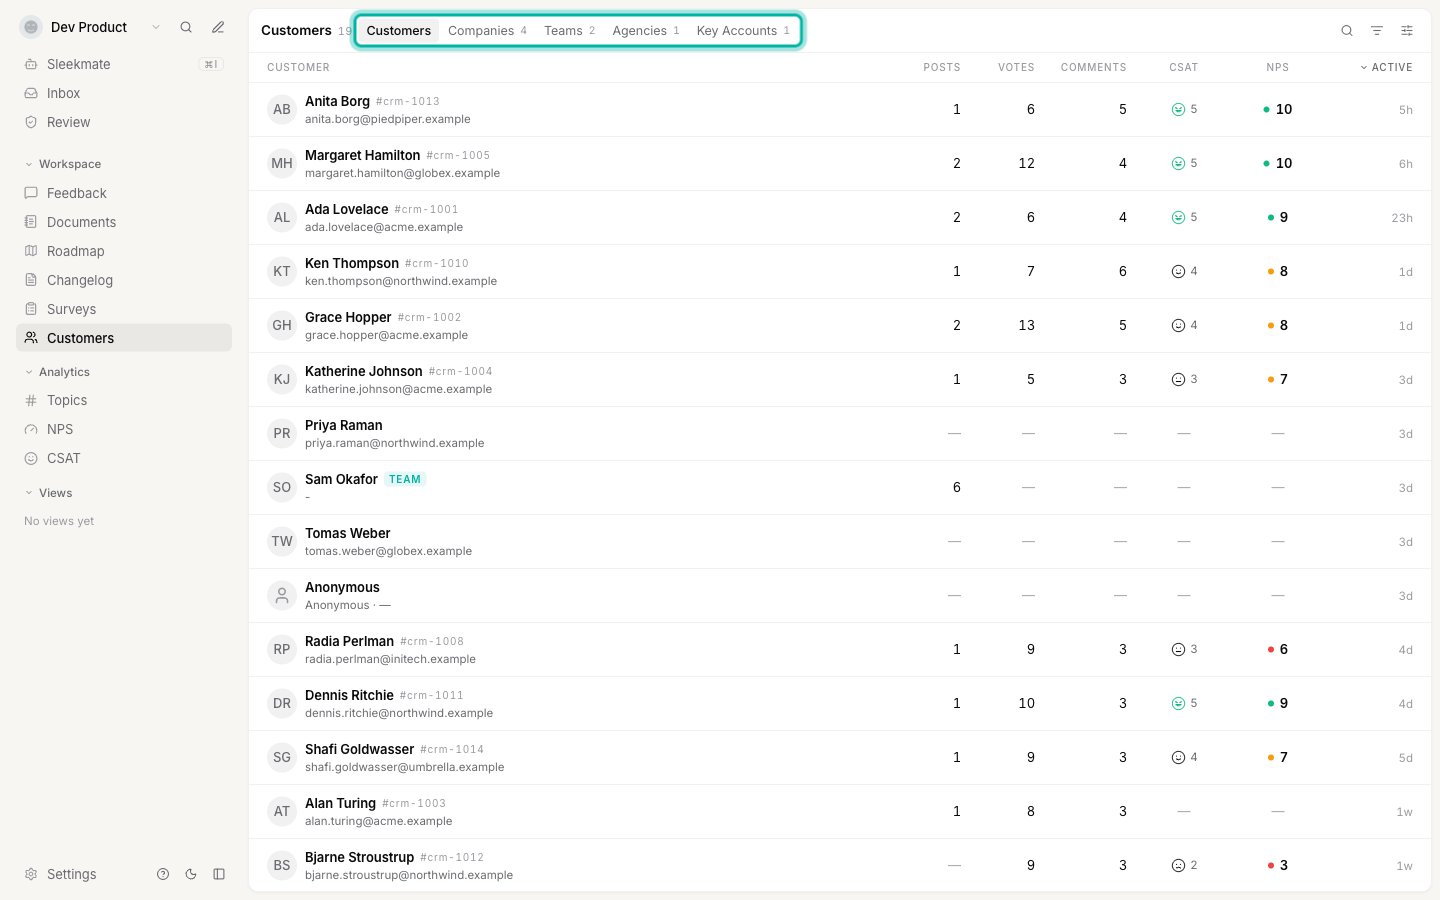
If you don’t see any extra tabs yet, it’s because no group has synced in through SSO for
this workspace so far, or your plan doesn’t include the feature (see above). The tab bar
stays hidden entirely until the first group arrives.
Reading the list
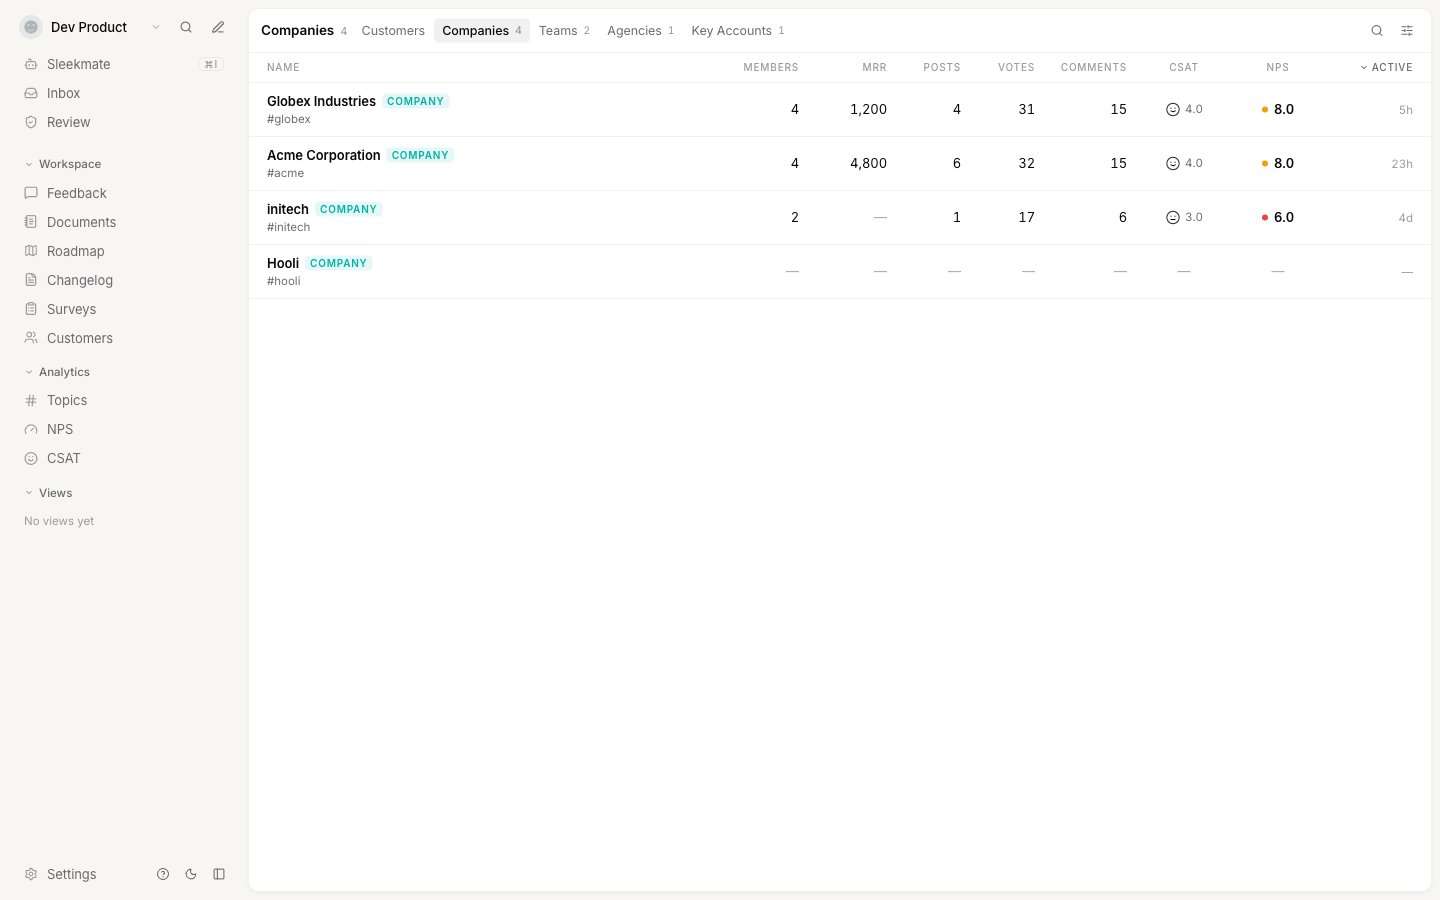
- Name and its type badge, plus the identifier your own system uses for it
- Members: how many of your customers belong to it
- MRR: the account’s monthly recurring revenue, if your integration sends one
- Posts, Votes, Comments: totals across every member
- CSAT and NPS: averaged across members who actually answered a satisfaction or promoter survey (a member who was never asked doesn’t drag the average down)
- Active: the most recent activity from any of its members
What Weight and MRR do
Weight (0 to 10) is how important this account is to you, the same idea as the weight you can already set on an individual customer. It feeds the company weight signal in the Impact Score, so a request backed by several of your heavier accounts can rank above one backed by several people inside a single account. It also gives your team something to sort the list by, and your SSO integration somewhere to put the number. MRR is the account’s monthly recurring revenue, stored as a plain number with no currency symbol, so pick one currency and use it consistently. It is added up behind every feedback post the account’s members vote on, counted once per account no matter how many of them voted. See Revenue behind a request. Both arrive from your SSO integration or the API, and can be adjusted afterward from the group’s profile.Opening a group’s profile
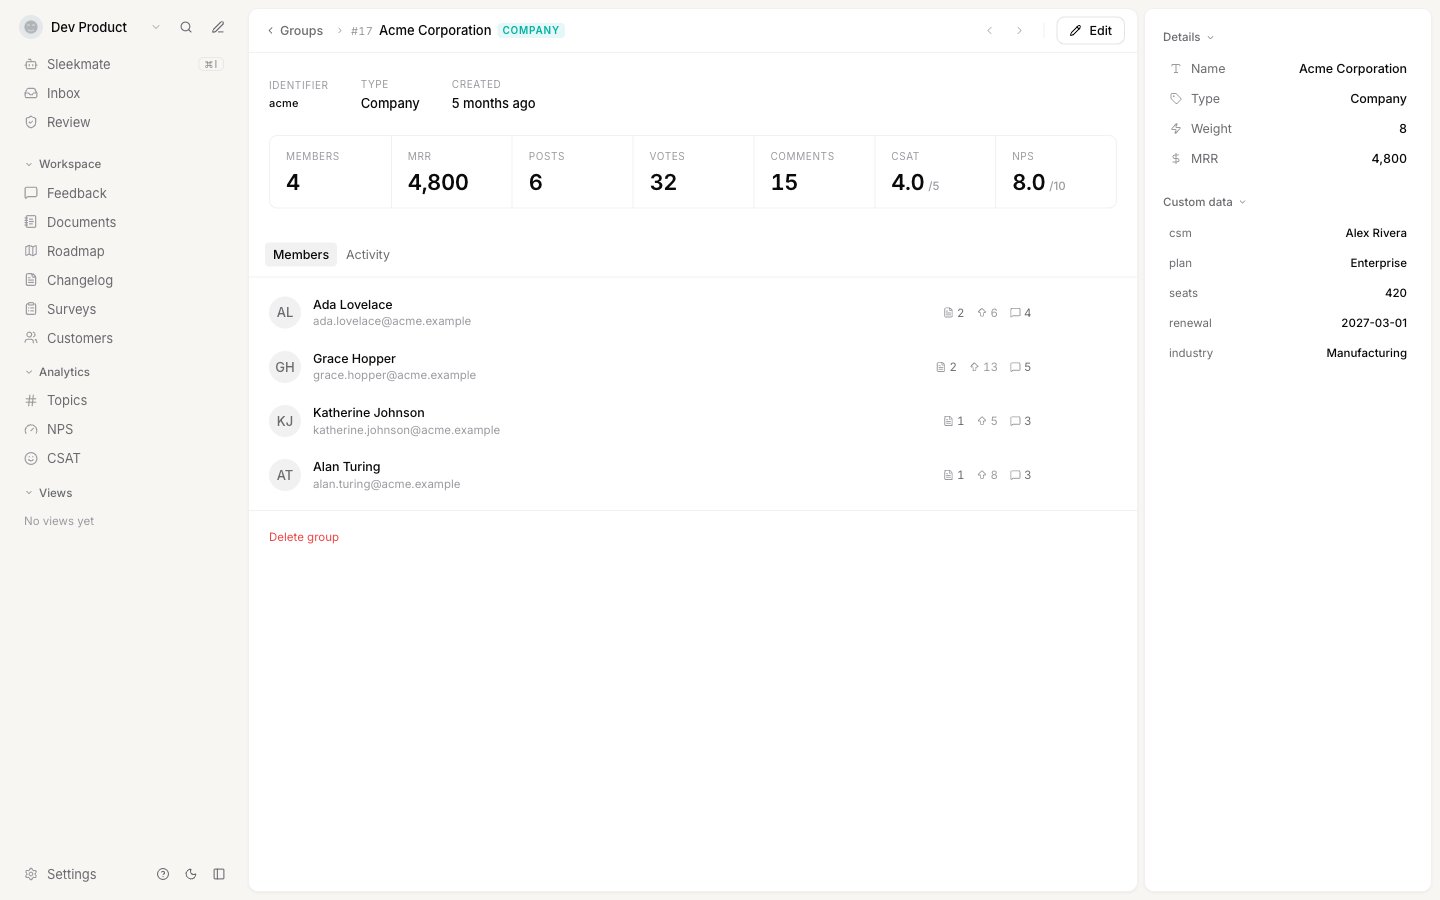
Select any row to see:- An identity summary: the identifier, type, and when the group was first created
- A stat band with Members, MRR, Posts, Votes, Comments, CSAT and NPS
- A Members tab, listing every customer in the group
- An Activity tab, showing their combined feedback activity in one feed
- An inspector panel on the right, with the group’s type, weight, MRR and any custom metadata
The activity feed covers up to the group’s 500 most recently active members. For a very
large account that means the feed is representative rather than exhaustive, and the app
tells you when it’s showing a partial view.
Assigning a customer to a group
1
Open the customer's profile
Go to a customer and select the Groups tab,
alongside Activity, Pageviews, Emails and Announcements.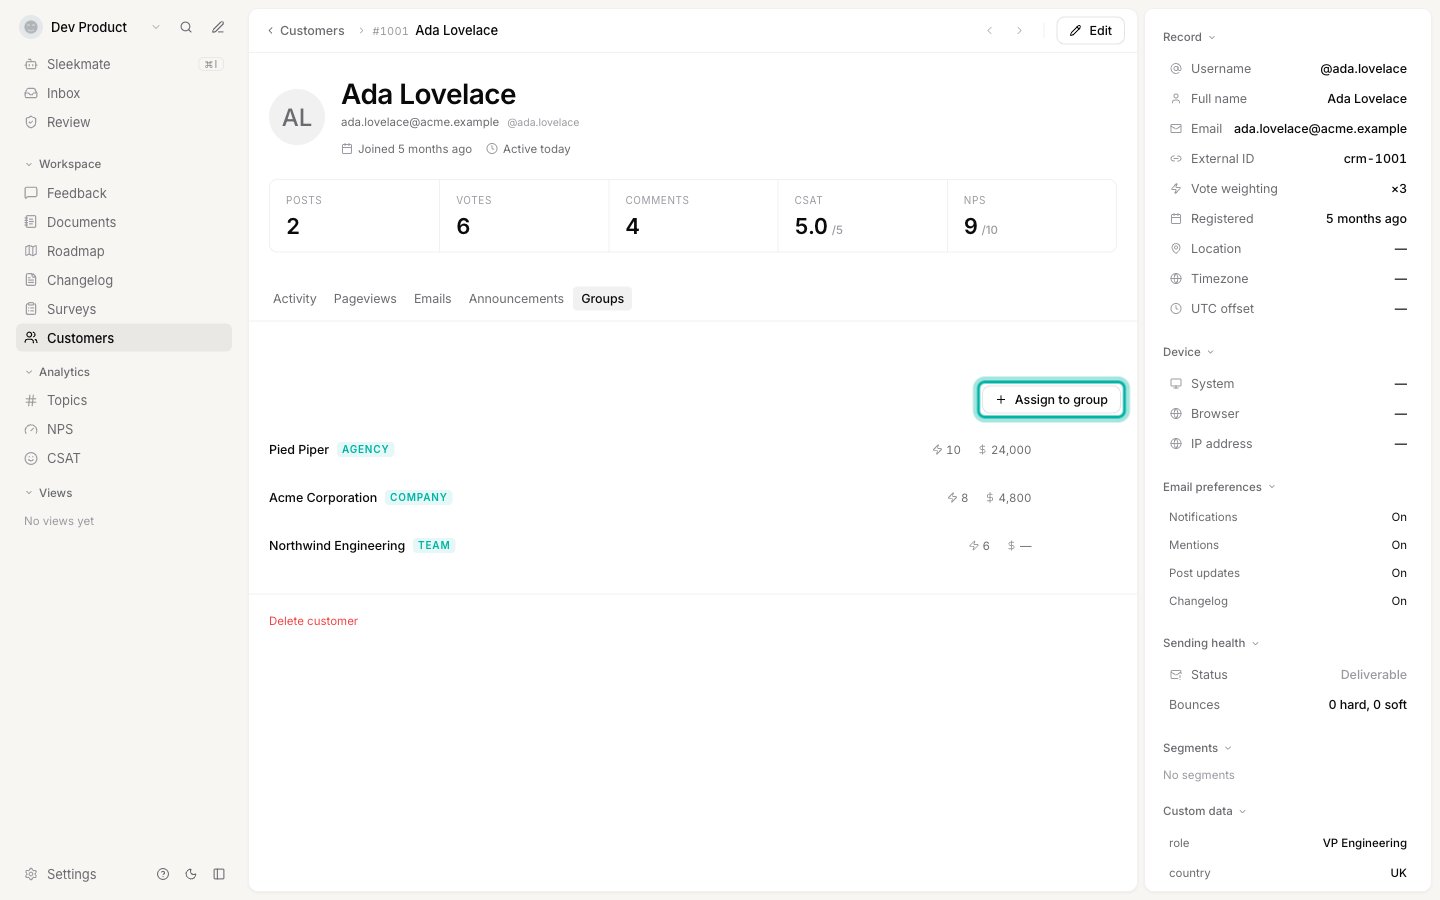
2
Assign them
Select Assign to group, search for the group, and pick it. The customer is added
immediately, and the group’s member count updates to match.
Removing a customer from a group
You can do this from either side:- From the customer: open the customer’s profile, select the Groups tab, hover the group you want to remove, and select Remove.
- From the group: open the group’s profile, select the Members tab, hover the customer’s row, and select Remove.
Removing a customer only unassigns them. It never deletes the customer, and it never deletes
the group. Because sign-ins only ever add customers to groups and never remove them, this is
the way to take a customer out of a group if your source system stops sending them, or if
you assigned them somewhere by mistake.
Editing a group
Open the group’s profile and select Edit in the header. You can change:- Name
- Type
- Weight
- MRR
- Custom metadata: add or remove key/value fields (up to 20), useful for anything your SSO integration doesn’t already send, like an account manager’s name or a renewal date
Deleting a group
Open the group’s profile and select Delete group at the bottom of the page. This removes the group and unassigns every one of its members. It doesn’t delete the customers themselves. If your SSO integration still sends that group on a later sign-in, it’s recreated from scratch, with no memory of its previous metadata or membership.Customer accounts
Weight, metadata, and everything else you can see and set on an individual customer.
Impact Score
How a group’s weight feeds the ranking, and what to set Max company weight to.
Setting up single sign-on
For your developers: how to add companies and teams to your SSO token.