> ## Documentation Index
> Fetch the complete documentation index at: https://sleekplan.com/llms.txt
> Use this file to discover all available pages before exploring further.
# Share and target a survey
> Show a Sleekplan survey to your users in two ways: share its public link, or attach it to a widget popup with an audience, timing, and page rules. Learn both, and how to reach the right people.
Once a survey has its questions, you need to put it in front of people. There are two ways to do that: share the survey's **public link**, or attach it to a **widget popup** that appears inside your Sleekplan widget. You can use both for the same survey.
## Share the public link
Every saved survey has its own web address that opens the survey as a standalone page, with no widget or site navigation around it. It is the quickest way to collect answers: paste the link into an email, a support reply, a chat message, or a "give feedback" button anywhere.
Go to [**Surveys**](https://app.sleekplan.com/surveys) and select the survey. Its **Public link** appears in the Overview panel on the right, below the stats.
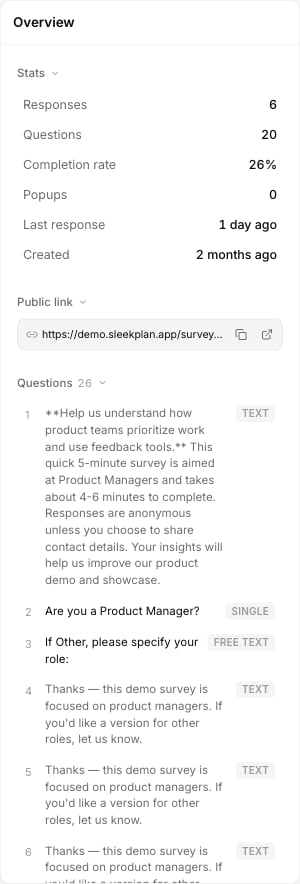 Use the copy control on the **Public link** field. You can also copy it from the survey's row menu in the list with **Copy link**.
In the editor, the **Preview** (eye) control opens the public page in a new tab so you can see exactly what respondents will get.
The public link works for anyone who opens it, so it is best for audiences you are already reaching directly, like people on an email list. To target people inside your product by who they are or what page they are on, use a widget popup instead.
## Attach a widget popup
A **popup** shows the survey inside your Sleekplan widget while people are using your product, and lets you choose who sees it, when, and on which pages. The easiest way to create one is straight from the survey, so the survey and its prompt stay together.
Open the survey in the [editor](/help/surveys/create-survey). A popup can only point at a saved survey, so the **Create a popup** action stays disabled until the survey exists ("Save the survey first to add a popup").
In the editor inspector, under **Distribution**, select **Create a popup**. A panel opens with this survey already linked, so you only set the targeting. Any popups already attached to the survey are listed here too.
Choose the popup's audience, timing, and page rules (described below), then save. The new popup appears in the survey's **Popups** list, and the survey's [results](/help/surveys/results) count how many popups point at it.
You can also create a survey popup from [**Settings → Public Portal & Widget → Outbound messages**](https://app.sleekplan.com/settings/outbound): select **New message**, pick the **Survey** type, and choose the survey there. The result is the same. See [Popups](/help/portal-widget/popups) for managing all your popups in one place.
## Choose who sees the popup
A survey popup uses the same targeting as every other [popup](/help/portal-widget/popups). In short:
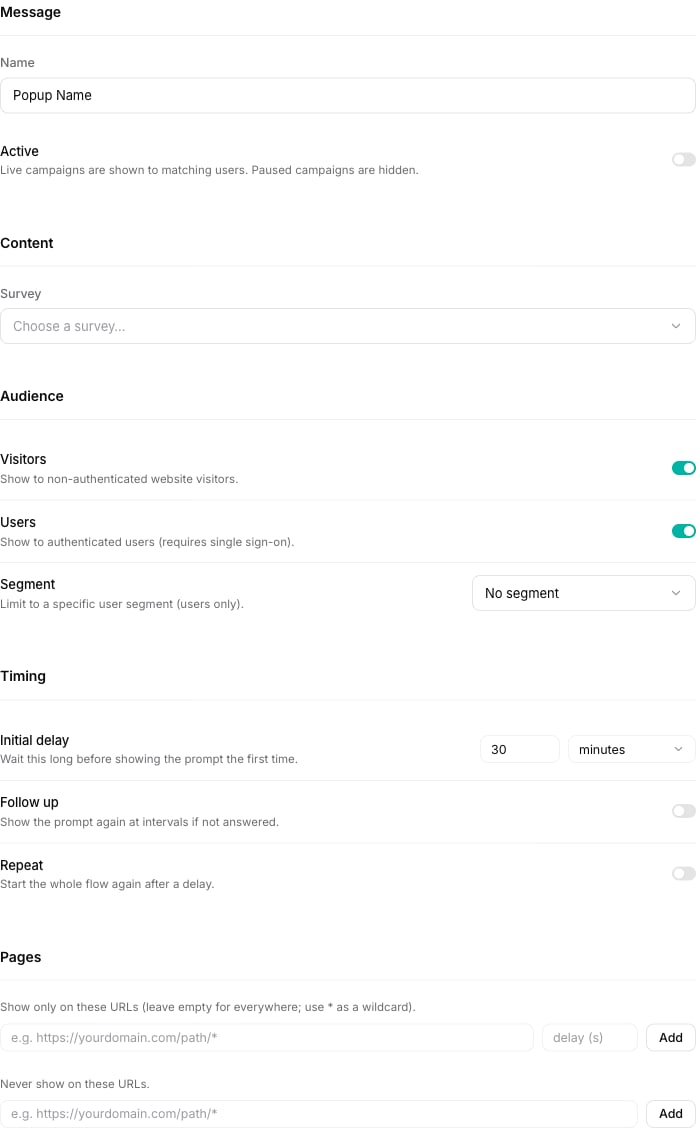
* **Audience.** Show it to **Visitors** (people who are not signed in), **Users** (signed-in users, which needs single sign-on), or narrow it to a single [user segment](/help/account-security/segments). Segments apply to signed-in users only.
* **Timing.** Set an **Initial delay** before it first appears, optionally **Follow up** to re-show it a set number of times if it is not answered, and optionally **Repeat** the whole flow after a delay.
* **Pages.** Limit the popup to specific URLs (use `*` as a wildcard), and exclude pages where it should never show, like a checkout or login screen.
Use the copy control on the **Public link** field. You can also copy it from the survey's row menu in the list with **Copy link**.
In the editor, the **Preview** (eye) control opens the public page in a new tab so you can see exactly what respondents will get.
The public link works for anyone who opens it, so it is best for audiences you are already reaching directly, like people on an email list. To target people inside your product by who they are or what page they are on, use a widget popup instead.
## Attach a widget popup
A **popup** shows the survey inside your Sleekplan widget while people are using your product, and lets you choose who sees it, when, and on which pages. The easiest way to create one is straight from the survey, so the survey and its prompt stay together.
Open the survey in the [editor](/help/surveys/create-survey). A popup can only point at a saved survey, so the **Create a popup** action stays disabled until the survey exists ("Save the survey first to add a popup").
In the editor inspector, under **Distribution**, select **Create a popup**. A panel opens with this survey already linked, so you only set the targeting. Any popups already attached to the survey are listed here too.
Choose the popup's audience, timing, and page rules (described below), then save. The new popup appears in the survey's **Popups** list, and the survey's [results](/help/surveys/results) count how many popups point at it.
You can also create a survey popup from [**Settings → Public Portal & Widget → Outbound messages**](https://app.sleekplan.com/settings/outbound): select **New message**, pick the **Survey** type, and choose the survey there. The result is the same. See [Popups](/help/portal-widget/popups) for managing all your popups in one place.
## Choose who sees the popup
A survey popup uses the same targeting as every other [popup](/help/portal-widget/popups). In short:
* **Audience.** Show it to **Visitors** (people who are not signed in), **Users** (signed-in users, which needs single sign-on), or narrow it to a single [user segment](/help/account-security/segments). Segments apply to signed-in users only.
* **Timing.** Set an **Initial delay** before it first appears, optionally **Follow up** to re-show it a set number of times if it is not answered, and optionally **Repeat** the whole flow after a delay.
* **Pages.** Limit the popup to specific URLs (use `*` as a wildcard), and exclude pages where it should never show, like a checkout or login screen.
 For the full detail on each targeting option, see [Popups](/help/portal-widget/popups).
Targeting a survey popup to a [user segment](/help/account-security/segments) requires a Business plan. Building and saving the survey itself already requires the Surveys module, also on the Business plan and above.
## Next steps
Manage every popup and learn each targeting option in depth.
Build the audiences you can target a survey popup to.
See the answers your published survey collects.
Add or adjust questions before you share the survey.
For the full detail on each targeting option, see [Popups](/help/portal-widget/popups).
Targeting a survey popup to a [user segment](/help/account-security/segments) requires a Business plan. Building and saving the survey itself already requires the Surveys module, also on the Business plan and above.
## Next steps
Manage every popup and learn each targeting option in depth.
Build the audiences you can target a survey popup to.
See the answers your published survey collects.
Add or adjust questions before you share the survey.