> ## Documentation Index
> Fetch the complete documentation index at: https://sleekplan.com/llms.txt
> Use this file to discover all available pages before exploring further.

# How to add analytics tracking to your public board

> Track visitor behavior on your standalone Sleekplan board by adding Google Analytics or any third-party analytics snippet through the Portal custom code settings.

Your standalone board is the public page where customers submit feedback, follow your roadmap, and read changelog updates. Adding an analytics tracker like Google Analytics lets you see how visitors use that page: which roadmap items draw the most views, how long people spend reading a changelog entry, and where they drop off.

Most analytics tools ship a snippet with two parts: a loader `<script src="...">` that pulls in the library, and a short block of inline JavaScript that configures it. Sleekplan keeps those two parts in separate fields, so you paste each one where it belongs.

<Info>
  Custom code is available on the **Pro** plan and above. The inline **Custom JavaScript** field also requires a [custom domain](/help/portal-widget/custom-domain), so your board runs on an address like `feedback.yourcompany.com`. On a free `.sleekplan.app` address the loader in the head still works, but the inline configuration is saved and ignored.
</Info>

<Warning>
  This applies to your **standalone board** only, the hosted page at your Sleekplan address or custom domain. It does **not** track the [embedded widget](/help/getting-started/install-widget) on your own site. The widget runs in an isolated frame, so measure it with the analytics you already run on the host page.
</Warning>

## Add Google Analytics

Google Analytics 4 gives you a two-line snippet. The first line is the loader, the second is the configuration. Split them across the two fields as shown below.

<Steps>
  <Step title="Open the Portal settings">
    Go to [**Settings → Public Portal & Widget → Portal**](https://app.sleekplan.com/settings/portal) and scroll to the **Custom code** section at the bottom of the page. Click it to expand.

    <img src="https://mintcdn.com/sleekplangmbh/aTt89CuN0RTRvfJ4/images/portal-custom-code-nav.png?fit=max&auto=format&n=aTt89CuN0RTRvfJ4&q=85&s=81b20a2d81cab1d3b5cd26cabd23beb6" alt="The Portal settings page open in the admin, with the Portal item highlighted in the Public Portal & Widget sidebar section" width="1440" height="900" data-path="images/portal-custom-code-nav.png" />
  </Step>

  <Step title="Paste the loader into the head markup">
    In the `<head> markup` field, add the Google tag loader. Keep the full `<script>` tag here, because this field accepts external script references.

    ```html theme={"system"}
    <script async src="https://www.googletagmanager.com/gtag/js?id=G-XXXXXXXXXX"></script>
    ```

    Replace `G-XXXXXXXXXX` with your own Measurement ID.
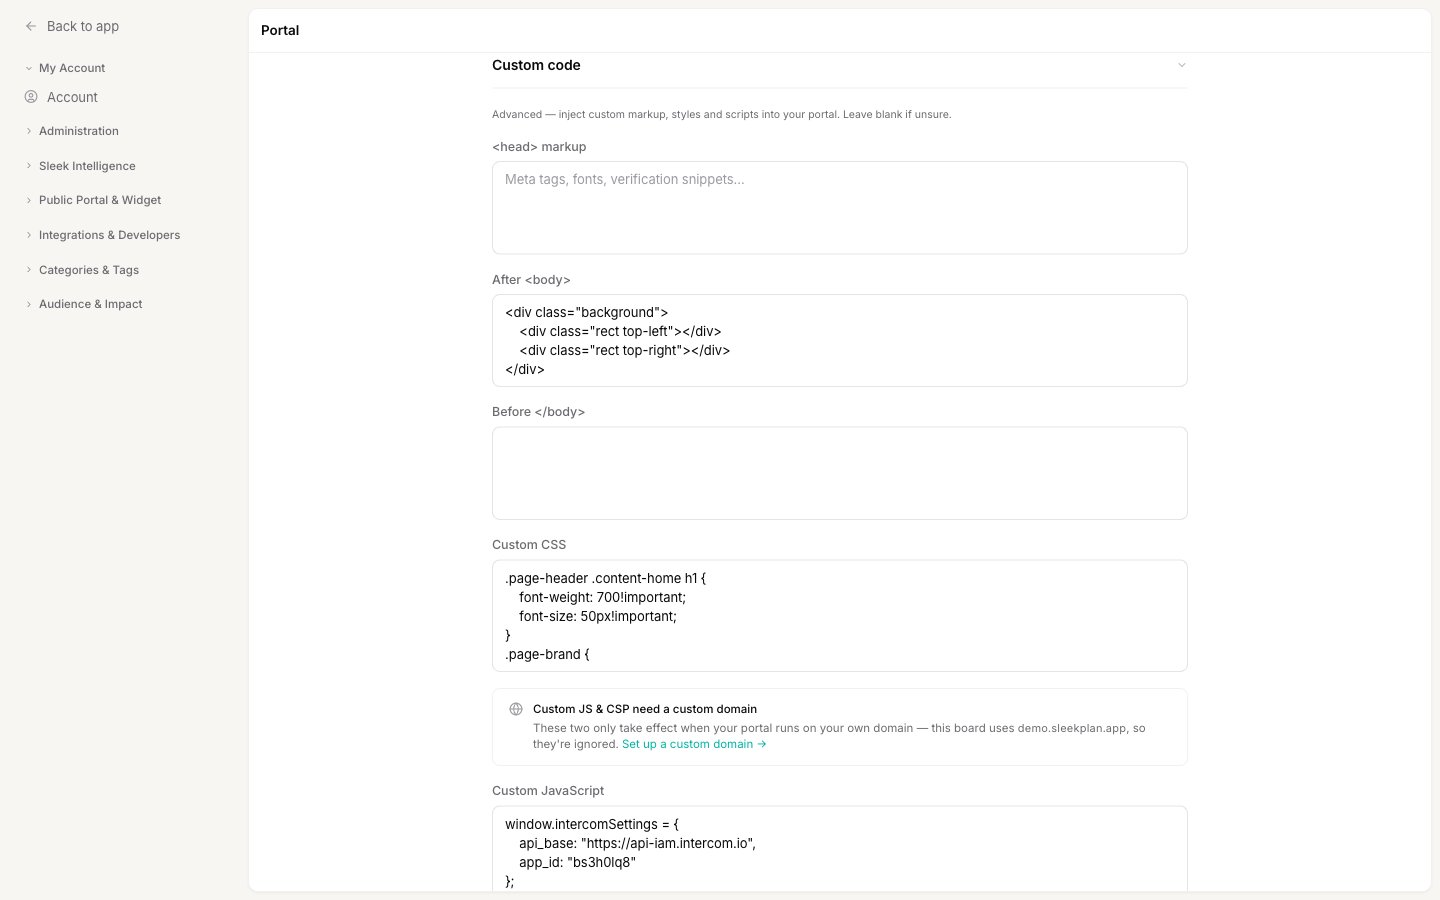
    <img src="https://mintcdn.com/sleekplangmbh/aTt89CuN0RTRvfJ4/images/portal-custom-code-fields.png?fit=max&auto=format&n=aTt89CuN0RTRvfJ4&q=85&s=3ef769f40c687ac9595caaedee14f3cb" alt="The expanded Custom code section showing the head markup, After body, Before body, and Custom JavaScript fields" width="1440" height="900" data-path="images/portal-custom-code-fields.png" />
  </Step>

  <Step title="Paste the configuration into Custom JavaScript">
    In the **Custom JavaScript** field, add the inline setup. Do **not** wrap it in a `<script>` tag: Sleekplan adds the wrapper for you, so pasting your own would break the code.

    ```js theme={"system"}
    window.dataLayer = window.dataLayer || [];
    function gtag(){dataLayer.push(arguments);}
    gtag('js', new Date());
    gtag('config', 'G-XXXXXXXXXX');
    ```
  </Step>

  <Step title="Save your changes">
    A save bar appears at the bottom of the page once you edit a field. Click **Save** to publish the tracker to your board. Open your board and confirm that events start arriving in your Google Analytics dashboard.
  </Step>
</Steps>

## Adding other trackers

The same split works for any third-party snippet that arrives as a loader plus an inline block, such as a product-analytics or chat tool. Put anything that looks like `<script src="...">` in the `<head> markup` field with its tag intact, and put the inline configuration (the code that would normally sit between `<script>` and `</script>`) in the **Custom JavaScript** field without the tags.

For a full reference on every field, what each one accepts, and the custom-domain requirement, see [Add custom code to your portal](/help/portal-widget/custom-code).

## Related

<CardGroup cols={2}>
  <Card title="Add custom code to your portal" icon="code" href="/help/portal-widget/custom-code">
    The complete reference for the head markup, CSS, and JavaScript fields.
  </Card>

  <Card title="Set up a custom domain" icon="globe" href="/help/portal-widget/custom-domain">
    Required before inline Custom JavaScript runs on your board.
  </Card>
</CardGroup>
