> ## Documentation Index
> Fetch the complete documentation index at: https://sleekplan.com/llms.txt
> Use this file to discover all available pages before exploring further.
# Set up user segments
> Group your customers into saved audiences built from their profile and activity, then use those segments to filter feedback, target popups, gate categories, and personalize action items.
A **segment** is a saved audience of your customers, defined by a set of conditions on their profile and activity. Think "customers on the Enterprise plan", "people who have cast 10 or more votes", or "users from Germany". Once a segment exists, you can reuse it across Sleekplan to filter, target, and personalize what different groups of customers see.
Membership is automatic. You never add customers to a segment by hand: Sleekplan evaluates each customer against the segment's conditions in real time, so anyone who currently matches is in, and anyone who stops matching drops out.
Segments require the **Business plan** and an **Admin** or **Manage** role. Segments are also evaluated per signed-in customer, so segment targeting on your widget and portal only applies to [identified users](/help/account-security/end-user-accounts) (people signed in through the widget or [single sign-on](https://sleekplan.com/docs/authentication/single-sign-on)). Anonymous visitors match no segment.
## Create a segment
Go to [**Settings → Audience & Impact → Segments**](https://app.sleekplan.com/settings/segments). This screen lists your existing segments and the custom fields available to build them.
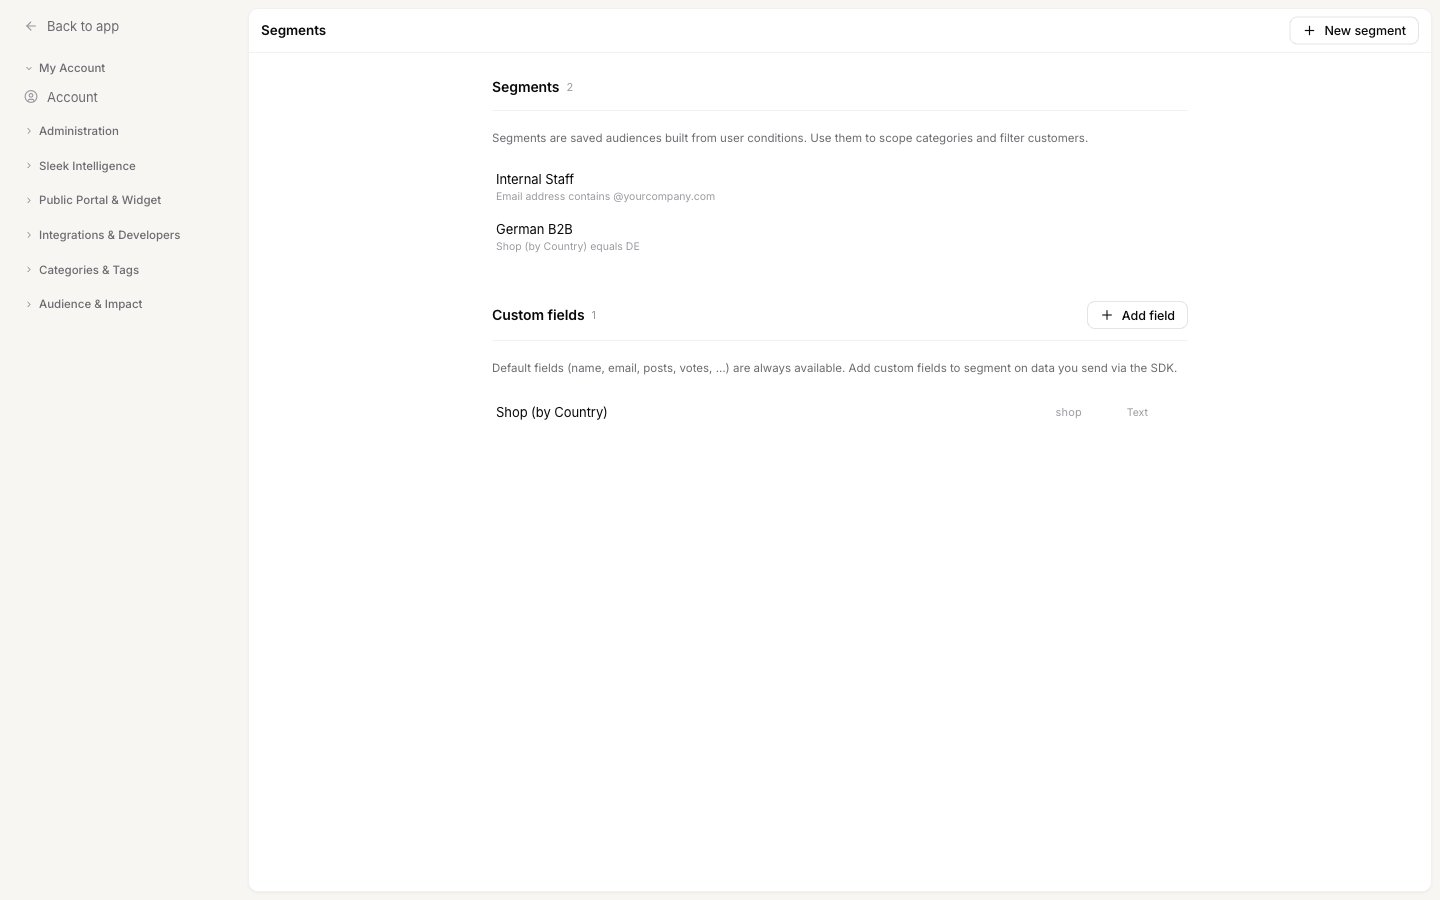 Click **New segment** in the top right. Give the segment a clear **Name** that describes the audience, such as "Power users" or "Enterprise customers". The name is how you will recognize the segment everywhere else you use it.
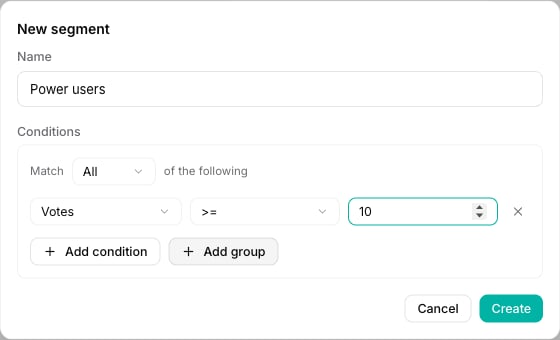 Under **Conditions**, set whether a customer must match **All** of the conditions (every one must be true) or **Any** of them (at least one is enough) using the **Match** dropdown.
Click **Add condition** and choose a **field**, a **condition** (the operator), and a **value**. For example, `Votes` · `>=` · `10` matches your most engaged customers. Add more conditions to narrow the audience, or use **Add group** to nest a set of conditions with its own All/Any logic for more advanced rules.
Click **Create**. The segment is saved immediately and becomes available in every place that supports segment targeting. You can edit or delete a segment later from the same screen using the pencil and trash icons on its row.
### Fields you can build conditions on
Every workspace starts with a set of default fields, split into text fields and numeric fields:
| Field | Type | Matches on |
| ----------------------------------------------------------- | ------ | ------------------------------------------ |
| User id, User name, Email address | Text | The customer's identity |
| Posts, Votes, Comments | Number | How active the customer is on your board |
| Satisfaction score | Number | Their CSAT rating |
| User created, User updated | Date | How long ago they joined or were last seen |
| City, Country, Timezone, Platform, Browser, Browser version | Text | Context captured by the widget |
Text fields offer operators like *equals*, *contains*, *begins with*, and *is empty*. Numeric fields offer comparisons like `=`, `>`, and `<=`. The date fields (User created, User updated) use day-based operators such as *more than \_\_ days ago*.
## Segment on your own data with custom fields
The default fields cover identity and activity, but the most powerful segments often use data only your product knows: plan tier, company name, MRR, signup source, and so on. You send this data to Sleekplan through the widget SDK, then add a matching **custom field** so you can build conditions on it.
On the [Segments settings](https://app.sleekplan.com/settings/segments) screen, in the **Custom fields** section, click **Add field**. Enter a **Field name** (the label you will see in the condition builder, e.g. "Plan tier"), an **Identifier** (the data key, e.g. `plan_tier`), and a **Type** of Text or Number.
Under **Conditions**, set whether a customer must match **All** of the conditions (every one must be true) or **Any** of them (at least one is enough) using the **Match** dropdown.
Click **Add condition** and choose a **field**, a **condition** (the operator), and a **value**. For example, `Votes` · `>=` · `10` matches your most engaged customers. Add more conditions to narrow the audience, or use **Add group** to nest a set of conditions with its own All/Any logic for more advanced rules.
Click **Create**. The segment is saved immediately and becomes available in every place that supports segment targeting. You can edit or delete a segment later from the same screen using the pencil and trash icons on its row.
### Fields you can build conditions on
Every workspace starts with a set of default fields, split into text fields and numeric fields:
| Field | Type | Matches on |
| ----------------------------------------------------------- | ------ | ------------------------------------------ |
| User id, User name, Email address | Text | The customer's identity |
| Posts, Votes, Comments | Number | How active the customer is on your board |
| Satisfaction score | Number | Their CSAT rating |
| User created, User updated | Date | How long ago they joined or were last seen |
| City, Country, Timezone, Platform, Browser, Browser version | Text | Context captured by the widget |
Text fields offer operators like *equals*, *contains*, *begins with*, and *is empty*. Numeric fields offer comparisons like `=`, `>`, and `<=`. The date fields (User created, User updated) use day-based operators such as *more than \_\_ days ago*.
## Segment on your own data with custom fields
The default fields cover identity and activity, but the most powerful segments often use data only your product knows: plan tier, company name, MRR, signup source, and so on. You send this data to Sleekplan through the widget SDK, then add a matching **custom field** so you can build conditions on it.
On the [Segments settings](https://app.sleekplan.com/settings/segments) screen, in the **Custom fields** section, click **Add field**. Enter a **Field name** (the label you will see in the condition builder, e.g. "Plan tier"), an **Identifier** (the data key, e.g. `plan_tier`), and a **Type** of Text or Number.
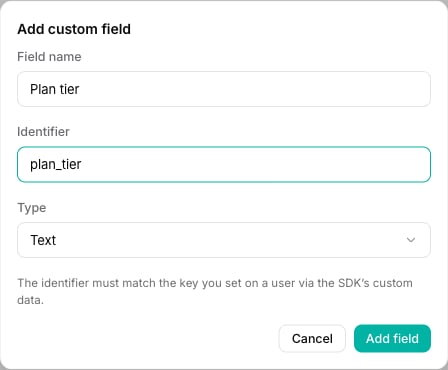 The **Identifier** must exactly match the key you attach to a user with the SDK's `addMetadata()` method. If you send `{ plan_tier: 'enterprise' }`, use `plan_tier` as the identifier. See [Identify and manage users](https://sleekplan.com/docs/sdk/user-setup) in the developer docs for how to pass this data.
Once added, the custom field appears in the **field** dropdown when you build a segment's conditions, right alongside the default fields.
Deleting a custom field removes it from the condition builder, and any segment that relied on it will no longer match on that field. Deleting a segment leaves your customers untouched (segments never store data on the customer), but anything scoped to that segment falls back to no segment.
## Where you can use segments
Setting up a segment is only the first half. The point of a segment is to reuse that audience across Sleekplan. Once a segment exists, you can:
* **Filter your feedback board by segment.** Narrow the feedback list to posts whose author belongs to a segment, so you can see what your enterprise customers or power users are asking for. See [Find and filter feedback](/help/feedback/filters) and save it as a reusable [view](/help/feedback/views).
* **Filter your Customers list by segment.** On the [Customers](https://app.sleekplan.com/customers) screen, filter your end users down to a single segment to browse or export just that audience.
* **Show categories to a segment.** Restrict a feedback [category](/help/feedback/categories) to a segment so only matching customers can see and post in that board, useful for private or beta boards.
* **Target widget popups and survey prompts.** Set a popup, changelog announcement, or NPS/CSAT survey to show only to a specific segment by setting its **Audience** to that segment (applies to signed-in users).
* **Personalize action items.** Show a [home-screen action tile](/help/portal-widget/widget-action-screen) only to a chosen segment by setting the tile's **Audience**, so different customers see different shortcuts.
* **Target changelog entries.** Limit a changelog entry to a segment so only that audience sees it in the widget and receives the notification about it.
* **Break down analytics by segment.** Filter your NPS and CSAT results by segment to compare satisfaction across different groups of customers.
Filter the feedback board by segment, status, category, and more.
Restrict a board to a segment so only matching customers see it.
Show different home-screen shortcuts to different segments.
Understand who your customers are and how they get identified.
The **Identifier** must exactly match the key you attach to a user with the SDK's `addMetadata()` method. If you send `{ plan_tier: 'enterprise' }`, use `plan_tier` as the identifier. See [Identify and manage users](https://sleekplan.com/docs/sdk/user-setup) in the developer docs for how to pass this data.
Once added, the custom field appears in the **field** dropdown when you build a segment's conditions, right alongside the default fields.
Deleting a custom field removes it from the condition builder, and any segment that relied on it will no longer match on that field. Deleting a segment leaves your customers untouched (segments never store data on the customer), but anything scoped to that segment falls back to no segment.
## Where you can use segments
Setting up a segment is only the first half. The point of a segment is to reuse that audience across Sleekplan. Once a segment exists, you can:
* **Filter your feedback board by segment.** Narrow the feedback list to posts whose author belongs to a segment, so you can see what your enterprise customers or power users are asking for. See [Find and filter feedback](/help/feedback/filters) and save it as a reusable [view](/help/feedback/views).
* **Filter your Customers list by segment.** On the [Customers](https://app.sleekplan.com/customers) screen, filter your end users down to a single segment to browse or export just that audience.
* **Show categories to a segment.** Restrict a feedback [category](/help/feedback/categories) to a segment so only matching customers can see and post in that board, useful for private or beta boards.
* **Target widget popups and survey prompts.** Set a popup, changelog announcement, or NPS/CSAT survey to show only to a specific segment by setting its **Audience** to that segment (applies to signed-in users).
* **Personalize action items.** Show a [home-screen action tile](/help/portal-widget/widget-action-screen) only to a chosen segment by setting the tile's **Audience**, so different customers see different shortcuts.
* **Target changelog entries.** Limit a changelog entry to a segment so only that audience sees it in the widget and receives the notification about it.
* **Break down analytics by segment.** Filter your NPS and CSAT results by segment to compare satisfaction across different groups of customers.
Filter the feedback board by segment, status, category, and more.
Restrict a board to a segment so only matching customers see it.
Show different home-screen shortcuts to different segments.
Understand who your customers are and how they get identified.